Forms allow you to capture relevant information from your prospects and gain an insight on your website visitors. Use forms to allow your prospects to submit their request online and to gather necessary information for providing your services. You can create forms with virtually any type of form fields based on your unique requirements.

Click Add Form to start the Create Form wizard. The Create Form wizard is a 4 step process that includes all the options that you will need to create a complete submission form, output, and response system.
As soon as you click the Add Form link a default form is automatically created for you. You can leave all the fields as-is or customize the fields list according to your desire. You can also create custom form fields on this page.
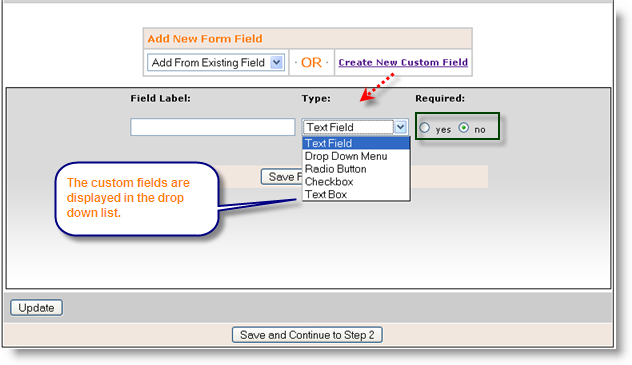
Creating a new custom field: Click the Create New custom field link. The screen expands to display the field label and the type of field. You can also configure whether the field is a required field or not.

Text field: Enter the name of the field label and select the Text field from the drop down list. Click Save Form Field. The field is displayed in the list. This is the same for the Text box option.
Drop down menu: For the drop down menu, you need to specify the values of the list as shown in the image. This screen is the same for the Radio button and Checkbox options also. Click Save and Continue to move to the next screen.
NOTE:
If you need any field value to be default,
select the checkbox of the field. The checkboxes against the other fields
will be disabled.
Note: Select the radio button whether to make this field
required or not.

The next screen displays the editor where you can enter any footer information. Enter the text/content you would like to display below this form.
This pages allow you to choose what information you would like to output after your website user submits the form. If you choose Thank You Confirmation, the information you enter in the text box below will be displayed. Choosing a Jump to Page or Go to URL will forward your website user to that page instead. Select the appropriate radio button.
The next step is to configure settings for the form. You must choose which email address you want to send leads to and which group you would like to save leads to. If you want you can choose to also send an auto-response email to your leads below. After making your selection you must click Continue and your new Lead Capture Form will be live on your website.